
Even though Microsoft might not be the first vendor to think about when talking about the Oracle Developer Cloud Service it actually has a great integration with Git and by having this with the Oracle Developer Cloud Service. If we take Microsoft Visual Studio Code as an example used by developers we can ensure this is directly connected with the Git repository within the Oracle Developer Cloud Service
When using Microsoft Visual Studio Code for the first time in combination with Oracle Developer Cloud Service you most likely need to install the Git client. As you can see you will get a message stating this in the below screenshot and directing you to the git-scm.com website where you can download the required client software to be able to interact with a Git repository.

Installing the Git client
As you encounter this message the first thing you will have to do is install the Git Client before you can continue. After you downloaded the windows Git Client installer it will take you through some standard steps of installing windows software.
Step 1 –
Agree with the license agreement

Step 2 –
Select a location to install the Git client

Step 3 –
Select the options you want the installer to install and the configuration you want it to make to your system

Step 4 –
Select a name for the shortcut to be used after the installation

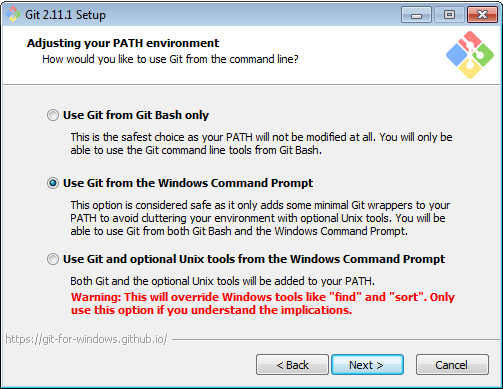
Step 5 –
Select the way you want to use Git from the command line. As I am using Linux for the most part when developing and windows only on occasion I am OK with the windows command prompt only however this is a personal preference.
Step 6 –
When connecting to Git via SSH you will need a SSH client. Git comes with a SSH client however, to ensure integration with other SSH tools and Tortoise which you might already have running on your Windows system you can select to not use the SSH client that is shipped with Git and select another one that is more integrated in your day to day work already.

Step 7 –
Everyone who has been working cross platform between windows and UNUX / linux systems know why the below question is asked. To ensure you do not have to go through a hell of dos2unix and unix2dos commands to make what you just developed usable you have to select the right option for your situation in this step.

Step 8 –
Select your terminal emulator. I have the preference for MinTTY. In case you are developing code that is perfectly fine working with the windows console you can also select the second option however I would advise in most cases to use the first option.

Step 9 –
Configure the extra options as shown below. This is valid for most situations and should provide you the best result

Step 10 –
In case you feel experimental you can select this option. It will give you built in difftool to find diffs in between versions. However, as the screen states,….. it is not that well tested.

Step 11 –
Click the install button and wait for a short period of time.
Checking Git installation in Microsoft Visual Studio Code
After you have ensured that the Git client is installed you have to restart Microsoft Visual Studio Code and open a folder (file -> Open Folder). You will be able to see that you opened a folder as you now have the “explorer” section opened for you and it shows the folder you selected.

If we now click the Git button we notice that we get a different result and we have the option initialize a Git repository, as shown below;

Connecting to Oracle Developer Cloud
The initial connection to a project hosted on the Oracle Developer Cloud Service is however more easily done via the windows file explorer. If we go to a location where we want to have our project code from the Oracle Developer cloud we can use a left mouse click to open the option menu and we will notice a “Git GUI Here” option which, when clicked will result in a menu with 3 options (or more if you already have created some projects) The options presented are:
- Create New Repository
- Clone Existing Repository
- Open Existing Repository
In effect we always start a project on the Oracle Developer Cloud Service so we do not want to create a new repository, we want to clone an existing repository and start working on it. When you select the “Clone Existing Repository” you will be presented with the below screen.

In this screen we have to enter the “source location” and the “target directory”. The target directory will be the directory on your local workstation you want to use to host a local working copy of the repository. The source location should be the http location of the Git repository in your Oracle Developer Cloud Service project. You can find the url needed when you navigate to the code section in the Oracle Developer Cloud Service as shown below which you have to copy and paste in the “source location” field of the Git GUI on your local workstation.

As soon as you click the clone button the process of cloning (downloading) the project to your local machine will start. In case this is the first time you will have to authenticate yourself using the username and password you use to access the Oracle Developer Cloud.
If you look into the folder that is created you will notice that all code (in our case only the README.md file) is now present locally.
Using it in Microsoft Visual Studio Code
Now that we have established a local copy of the Git repository on our local workstation from the Oracle Developer Cloud Service we can also start using it in Microsoft Visual Studio Code. If we open Microsoft Visual Studio Code and open the folder that was created in the previous step we will see that we do not have to create a repository. It is already picking up the information from the Git client that this is under Git.

Now, if we add a file in the directory by creating a new file in Microsoft Visual Studio Code you will notice that this is detected and shown as a blue 1 icon on the Git button, indicating we have one changes that is not committed to Git.

If we go to the Git screen we can add a comment and “save” this. However, it is good to remember that this will not ensure that you actually commit the change to the Oracle Developer Cloud Service Git repository

If we want to ensure that the file is also actually pushed to the Git repository on the Oracle Developer Cloud Service we have to use the “Push to” option which will make sure your change is send to the Oracle Developer Cloud Service.
In conclusion
In effect every developer tool, including Microsoft Visual Studio Code has the ability to work with the Oracle Developer Cloud Service. And in cases where your developer tool is not supporting natively Git you can always use the Git GUI to ensure you have this integration.
No comments:
Post a Comment